
DIY P2P Wireless WiFi Ethernet Bridge (Outdoor, Long Range)
Apr 26, 2018
Try our affordably priced DIY Long Range P2P Wireless Ethernet Bridge kit at under $350. It is a plug and play kit for your broadband wireless coverage solution. It projects network access to other locations securely using an existing wireless network. It is a complete "do it yourself" kit. It creates a point to point wifi bridge using two directional antennas with integrated pre-configured or pre-paired radios.

If you need to send a wireless network connection from one building to another, but do not have the time and money to set up a new one, we highly recommend this affordably priced DIY long range P2P wireless bridging kit. It easily facilitates outspread internet network access to other locations using an existing wireless network. It is a true plug and play system - Integrated radios within antennas are pre-configured or pre-paired.
The Long Range P2P Wireless Ethernet Bridge, which is very affordable, provides wireless connectivity that is powerful and connects automatically to your phones, camera, laptop and other devices. It delivers long and short-range point-to-point links in place of cabling. The two 16 dB flat panel antennas are made very durable to resist damage from impacts. They are very sleek and about the size of an average palm, only slightly longer. When installed as instructed, both antennas connect wirelessly, providing an optimal network deployment.
Each antenna has a port to insert standard networking cable such as RJ45 Cat6a shielded ethernet cable. This retail bridge-in-a-box kit has industrial grade clamps included for mounting each of the two antennas to any suitable pole where they can be mounted with ease. After installation of both antennae facing each other, the mount included allows tilting of antenna with indicator lights on the back of antenna to ensure a good point to point bridge connection. The quick start guide provided with the kit provides step by step instructions for complete installation from installing antennas to powering them up and aligning them perfectly.
Benefits of using Outdoor Long Range P2P Wireless Ethernet Bridge.
Some of the benefits of using the Long Range P2P Broadband WiFi Bridge includes the following:
- The Long Range P2P Wireless Ethernet Bridge is built to be waterproof and dustproof. It is dependable even in harsh environment.
- It also delivers long and short range point to point links.
- It supports a wide range of outdoor applications.
- It has the secure guest network feature that can improve a customer's experience.
- It links two networks together so that files can be shared on Internet.
DIY steps to set up the long range wireless P2P bridge.
Installing the Long Range Point to Point Wireless Ethernet Bridge does not take more than 10 minutes. Each kit of the wireless fidelity ethernet bridge contains the following:
- Two high-powered directional antennas.
- Power over Ethernet (PoE) injectors.
- Heavy-duty pole-mount assemble. The pole itself is not included.
- Power supplies.
To install the Long Range WiFi P2P Bridge, follow the steps laid down below.
Step 1: Planning your installation.
The high power long range P2P wireless invisible ethernet bridge is made up of two antennas - one for Side A and other for Side B. To ensure that Ethernet Bridge works well at the highest speed, you must install antennas facing each other with the direct line of sight without interference from buildings, rocks or trees.
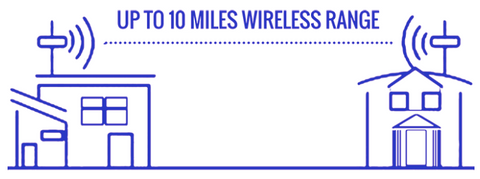
When installing both ends of antennas over a long distance, Google Map could be of help to you. Note that an Ethernet Bridge can work well over a distance of up to 10 miles but it requires that you aim precisely and ensure that there's a clear line of sight between both antennas.
Side A of Ethernet Bridge must be installed at the location of your primary network or router while the Side B will have to be installed at your remote location.
Step 2: Mounting antennas with adjustable mount and U-bolt.
You can choose to mount your antennas on your Window or Pole. Installing antennas on the window can reduce the range and data speed of Ethernet Bridge, while the pole mount is highly recommended for outdoor and long-term installations because it is generally at higher altitude which bypasses more obstructions such as other buildings and trees. After mounting antennas on the pole, the next step is to complete and attach U-Bolt to your Ethernet Bridge by sliding the Bridge Kit over the top of the Pole Mount. Then use your U-Bolt to tighten it.
Step 3: Power on and Adjust/ Tilt Antenna as needed for best connection.
Power on by plugging in the power cord provided to begin alignment. Follow instructions provided to log in and access unit online. Navigate to Configuration > Radio > Configure the operating frequency and channel band width utilized by your network. Then click, "save". Then using e-align feature, tilt antenna to find the best signal. Finally, tighten adjustable mount to set antenna in place.
Conclusion.
Try our affordably priced DIY Long Range P2P Wireless Ethernet Bridge kit which is a plug and play kit. It allows you securely project network access to another building location using an existing wireless network. It creates a point to point wifi bridge using two directional antennas with pre-configured integrated radios.
Video Transcription:
SignalBooster.com offers outdoor wireless ethernet bridge. It consists of two radios that are pre-paired to link wirelessly with each other from one point to another, up to 10 miles apart. The radios are made of industrial grade construction and would not break easily despite falls from high altitudes. They operate on standard 5 gigahertz Wi-Fi frequencies, covering 5150 to 5875 megahertz.
They can provide thoroughput up to 200 megabits per second, depending upon the distance and obstructions in between. They offer flexible channel width of 5, 10, 20, and 40 megahertz channels. The system offers high security with AES-128 data encryption, and radius-based authentication.
Installation: Verify all parts. Attach the mounting bracket to a pole using the provided metal clamp. Lock the device into the bracket, then power on the device. Check the back of the unit. The LEDs light and sequence should indicate that it is scanning for the other end of the link. Once a connection is established, adjust the device to maximize the number of LEDs lit on the signal indicator.
Resources:
Review our other WiFi Signal Boosters. If you require professional installation of your WiFi signal boosting system, request a quote for Wi-Fi Signal Booster Installation Service. We provide certified installations by experienced installers and a 60 days money back total satisfaction guarantee for all our wireless signal enhancing boosters, amplifiers, or repeaters.
Share this post
8 comments
I’m skeptical whether you can install this yourself. The wi-fi ethernet bridge looks amazing but is it really a DIY project for the average person? Things have improved over the years, but I don’t think I could do this.
Your video indicates this can be used for both short and long distance connections. I am looking at about 1200’ building to building. I realize the data flow is effected by distance; would you expect this to work with streaming video like Netflix or Hulu at 1200’?
Is there an installation manual I can download and read pre-sale?
Thank you;
Steve
Useless without a price; $5 or $5000???
This may be silly, but the video thumbnail shows throughput at 200 MBps (Megabytes per second) and your article states throughput of up to 200 megabits per second (Mbps). To put that in perspective, 200 MBps is ~1.6 Gbps. I assume Mbps is the accurate speed. It might be worth correcting the video.
Pls. Tell me the details of about P2P .
I have strong net connection about 50 to 100 mbps unlimited capacity and i need internet in my other 2 house the distance from the source is approx. 500 mtrs.
I want to know how much it will cost me ?
How long the shipping will take and where it will come from?
Thank you very much
When I read this, I wasn’t just blown away by the concept of wireless point to point connection between two sites (although that is pretty impressive), but by the idea of DIY point to point wireless. Do it yourself for something like this? That’s how simplified technology has become. Personally, I’d be skeptical about my own ability to DIY for this, but I know plenty of handy people who wouldn’t have a problem (and of course, they can install it for me). A WiFi bridge is a terrific idea made even better by easy installation.
This is something that looks like you’ll be seeing a lot more of over the next few years. Wi-Fi has become as common as traditional ethernet cable-driven Internet access was back in the early 2000’s. People want the convenience of a strong wireless signal, especially when they have larger areas to provide coverage in. This point to point wireless bridge kit for the outdoors looks easy to set up too. I like the combination of written set-up instructions and the video instructions. From cell phone signal boosters to long range wireless WiFi ethernet bridges, it’s getting easier to use technology at greater ranges.
This may sound wacky, but I was wondering how to connect two buildings like this. With all the cool gizmos out there, I was curious when someone would put out a point to point wireless bridge kit for the outdoors. The idea of point to point wireless Internet probably isn’t brand-new, but it is to me. Thank the stars I can look for the best point to point wireless bridge set-up. As usual, this website does a nice job explaining things. For example, I didn’t know it was possible to set this up in about 10 minutes. That’s the kind of DIY point to point wireless I can set up. Once again, this site delivers the information and leaves it to readers to decide what to do with it.