SureCall Enterprise Sentry 4G Remote Control for Force5 Only
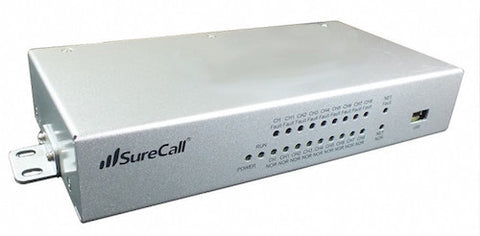
SureCall Enterprise Sentry 4G Remote Control for Force5 Only
Buy Now, Pay Later with No Interest if paid in full within 6-12 months. Choose Klarna payment option at the checkout for details of this, and other long-term low-interest financing options.
Free Lifetime Support. SKU / Model: SC-SentryE


1(855)846-2654
Need installation quote, or help with designing a custom solution? Submit a request for quote.
- Description
- Reviews
- Questions & Answers
- Data Sheet / User Guide
- Make An Offer
- Warning
Description
Product Description
SureCall’s Enterprise Sentry is a powerful remote monitoring and control system for its Enterprise Force5 cell phone signal boosters. Enterprise Sentry is only compatible with Enterprise Force5 and not with any other device.
What comes with the box?
The Sentry comes with the basic hardware, an AC power supply and a ribbon cable. UPC: 729198465193.
What does the Enterprise Sentry do?
#1: The Sentry is a remote control system that monitors and adjusts the performance of the Force5 booster remotely from an application on your computer or tablet.
#2: It identifies the strongest signal strength that is available in a building or an area, which makes it easier to install the Force5 device and ensures that the installation is done perfectly.
#3: The Sentry identifies malfunctions caused due to any unforeseen changes in the cellular towers or the newly installed repeater systems,
#4: Once the malfunctions are identified, the Sentry alerts the end-users or installers about them and informs in detail about the nature of the booster failures through an automated email.
#5: The Sentry allows you to remotely adjust and control both uplink and downlink and all the bands.
#6: The device detects oscillations in the cell phone signal booster and corrects them remotely as required.
Wrap Up
The Enterprise Sentry is an impressive technological innovation in cellular signal booster installation and optimization. It makes it possible for you to manage your Force5 signal boosters remotely from your laptop or tablet. It also helps with fast and efficient installation of the Enterprise Force5 booster.
Wilson Electronics brands weBoost and Wilson Pro do not offer such remote monitoring control system type product at this time.
SureCall Sentry Annual User Monitoring License will be required in the near future, so buy today.
General instructions on how to set up the Sentry Remote Monitoring System.
Video provided details the following. Learn a little more about SureCall’s remote monitoring system - the Sentry, and how to set it up. When you open the box the Sentry comes in, you will find the Sentry remote monitoring system, a ribbon cable, an AC power adapter with barrel connector, a USB cable and a user manual.
This slide presentation will include: an installation overview, instructions on registering the Sentry, the process of adding a booster, an overview of how to use the included antenna placement tool and instructions on how to digitally configure the gain settings through the Sentry dashboard.
The first step in installing the Sentry device is to connect the ribbon cable from the Sentry’s RF data port to the Booster’s GUI port.
Step 2.
Connect the USB cable from the Sentry’s USB port to the USB port on the computer you are going to register and monitor the booster with.
Step 3.
Connect the LAN or local area network cable to the Sentry’s LAN port and the other end to your router. Connect the AC power adapter to the Sentry’s power port and the other end to an electrical outlet. You may now turn the Sentry unit on.
Download and save the century software to your desktop from the SureCall website.
Keep in mind the Sentry software only works for PCs. Run the setup file to install the software.
In order to register and use the Sentry unit and software, first open the Sentry application and then click on the Register button.
Next, click on the User Registration button. Fill in the user registration page completely. Here you can choose your username, create a password, enter the email you wish the alert notifications to come to and the primary user’s phone number.
Click Register and login to the Sentry application using your new name and password.
Now you're ready to sync the Sentry unit with the Sentry software so that you can adjust and monitor your SureCall cellular signal booster.
Login to the Sentry Dashboard and click the Add Booster button at the top left of the column. Click on the drop-down box for the correct COM port and click the Open button.
Now click the Refresh button and the rest of the IP information should populate automatically. The server port number will always be 5210. If for some reason, you do not see the dashboard after adding a booster, you may have an incorrect COM port selected. Your ports can typically be found in your Device Manager. Please make sure that the COM port number matches the one displayed under the USB serial port.
The Sentry IP server address can be found here. Once the information for the IP address and the server port number matches what is on this screen, click Apply.
Now you have the opportunity to create a name for the booster this century is synced with. If you are planning on using multiple boosters, consider giving each booster a unique easy to remember name. This will make monitoring and troubleshooting later much easier. Once you have created a name and enter the address where the booster and the Sentry are located, click Add.
You should now see the booster you just registered on the Sentry dashboard. To access the booster information through the Sentry unit, simply click on the booster you wish to view and click Refresh. You can now unplug the USB from the PC.
The Sentry is not only a monitoring tool, it is also an installation tool. We will now take a look at the antenna placement tool included in the Sentry software.
Using this tool can help you find the best place to mount the external donor antenna. On the Sentry application dashboard, right-click on the registered booster, click Antenna Position Debug.
Once the outside antenna is connected to the booster, click the Measure button. The Sentry will measure and log the incoming signal strength on each RF band. You will also see what time of the day this reading was taken.
The antenna placement tool can log as many as five different outside antenna positions. Once you have logged five potential donor antenna locations, click the Compare button.
The antenna placement tool will then highlight the position that had the best incoming signal across all five bands.
We will now take a look at the gain configuration properties of the Sentry remote monitoring system. The Sentry allows you to monitor the booster remotely and make changes to the booster’s gain digitally. It can aid in adjusting the booster to help eliminate the warning lights. It will also email the registered user if a warning light is activated. This email will let you know what light indicator has been activated such as oscillation in the system an overpowering incoming signal or over attenuation resulting in the band shutting off.
On the Sentry dashboard, the red light means the incoming signal is too strong. You can digitally adjust the downlink in 5dB increments until the problem is resolved. Remember to click Apply and then Refresh after each adjustment.
If there's a yellow flashing light, that means the band is automatically adjusting itself. This is a normal booster function called Automatic Gain Control and should not be a reason to be concerned. The yellow solid means that the band is in sleep mode. This means it is not detecting any uplink and has turned off until it detects an uplink signal. This is a normal booster function as well and should not be a reason to be concerned.
Yellow and red flashing means there is not enough separation between the outdoor and the closest indoor antenna. This is causing a feedback loop called Oscillation in the system and should be fixed before leaving the facility that the booster is installed in. This alert will cause an email to be sent out to the registered user alerting them to the problem.
One way to fix this problem is to move the outside antenna further away from the closest indoor antenna. You can also attenuate the booster but this will result in a smaller area of signal coverage coming out of each of the internal or broadcast antennas.
If you wish to reset the booster back to its full gain, simply access the booster submenu by right-clicking on the correct booster and choose Restore Default Settings. All digital attenuation will return to 0 but manual attenuation will remain unchanged.
As always, the SureCall team is here to help in any way possible. If your questions have not been answered through this presentation, feel free to contact our US-based technical support team.
Reviews
Questions & Answers
QUESTIONS & ANSWERS
Have a Question?
Be the first to ask a question about this.
Data Sheet / User Guide
Data Sheet
User Guide
Make An Offer
Warning
Note: For any signal booster to help, outside signal strength must be at least -110 dB or there must be a clear line of sight to a cell tower that is within twenty miles. Before ordering, please check outside signal level in decibels or ensure that you can make and hold a phone call at any good spot outside where you can mount an exterior antenna. Square footage stated in signal booster listings is based on good signal outside. If it is any weaker, the boosted sq. ft. area will be considerably lower, accordingly.
Kevin K. of Anderson, California gave the following review:
Website is easy to use with plain straight forward info but could have had more on testing signal strength to make sure you get a strong enough booster.
Therefore, please note that stated sq. ft. coverage is based on good signal outside. For best results: If outside signal is weak, we suggest choosing the next higher sq. ft. coverage kit. If outside signal is very weak, we suggest choosing the kit with even more higher sq. ft. range bracket. Basically, higher the sq. ft. bracket, the more powerful the signal amplifier with greater Gain as well as higher uplink and downlink output power.
If outside signal is too weak (weaker than -110 dB), submit request for cell coverage solution assessment. Upon receipt of questionnaire, we will perform residential or business site survey. This will help us determine the system that is needed to improve cell coverage. Then, we will create system design using that system such as femtocell, active or hybrid distributed antenna system (DAS), or other carrier feed signal enhancing method available that will work at your signal-challenged location. Finally, we will schedule for installation after equipment and installation service quote has been approved by you, or your company.
For non installation-included kits: Most home / office / building cell signal booster kits only include bracket to mount exterior antenna on outside wall, edge of roof, or existing pipe up to 2 inches in diameter. Mounting pole not included with most kits, unless stated specifically that it is included for free. Therefore, a mounting post must be purchased separately if you will require it to mount exterior antenna.

Related Products